This is the multi-page printable view of this section.
Click here to print.
Return to the regular view of this page.
STEM (Science Technology Engineering Mathematics) MicroBit, Robotics, and Raspberry Pi Workshops
Goals:
- Every child finishing year 6 in Tasmania has done the following:
- Programmed a robot to perform a real-world task
- Developed a very simple AI Program using pre-built tools
- Built software or a machine to automate a task.
HIVE Science Centre (School Holidays)
Attention parents! Are you looking for a fun and educational activity for your child during the school holidays? Look no further!
The Hive Ulverstone is excited to present a STEM Light and Robotics display featuring interactive robotics demonstrations and activities. Your child will have the chance to see firsthand how science, technology, engineering, and math principles come together in the exciting world of robotics.
- Learn about robotics and technology
- Take part in interactive demonstrations and activities.
- Control LED lighting
- Use coloured magnetic blocks to build and see the world in different colours.
The STEM Light and Robotics display will be held at Hive Ulverstone. This is a great opportunity for your child to learn about robotics technology in a hands-on and engaging environment.
Don’t miss out on this opportunity to learn and have fun!
We hope to see you there!
STEM Activities review
KMART Science Squad Electrode Plasma Ball and Energy Bar
https://www.kmart.com.au/product/science-squad-electrode-plasma-ball-and-energy-bar-42854715/
Cheap cheap cheap. It is $15.00 the picture does not match the items in the box.
Consider
1 - Raspberry Pi Sustainability
Connection to Raspberry Pi
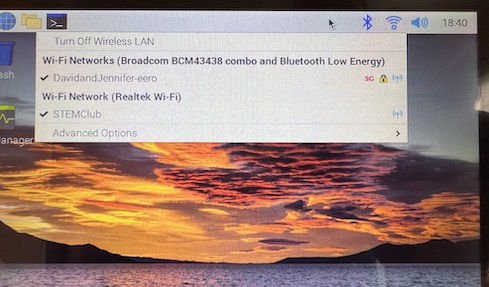
Currently set to try David’s iPhone WIFI Hotspot when in range. This is due to limitations on Hive WIFI network for Raspberry Pi devices.
SSH Connection
Get the IP Address from Raspberry Pi
ifconfig wlan0
ssh hive@172.20.10.6
password Ulverstone
cd Workspace/sustainability/
Software
Pull down latest software from Git
Open Terminal and change to sustainability folder.
git pull
If there are local changes that need to be wiped use:
git reset –hard
git pull
debugging
With the physical USB keyboard, the following can be done, while the software is displaying use:
s = manually toggle sun is out.
Software used
sudo apt install python3-gpiozero
2 - Solderless Breadboards for simple electronic circuits
I need small solderless breadboards to demonstrate simple circuits people can take home. This means they need to be cheap to purchase.
Perfect size for project: 50 Tie Points
Converting 300 tie points into 50 tie points
Used a hacksaw to cut along the 20 and 40 lines. Also cut in half.
If I was doing this more often, need a mini bandsaw.
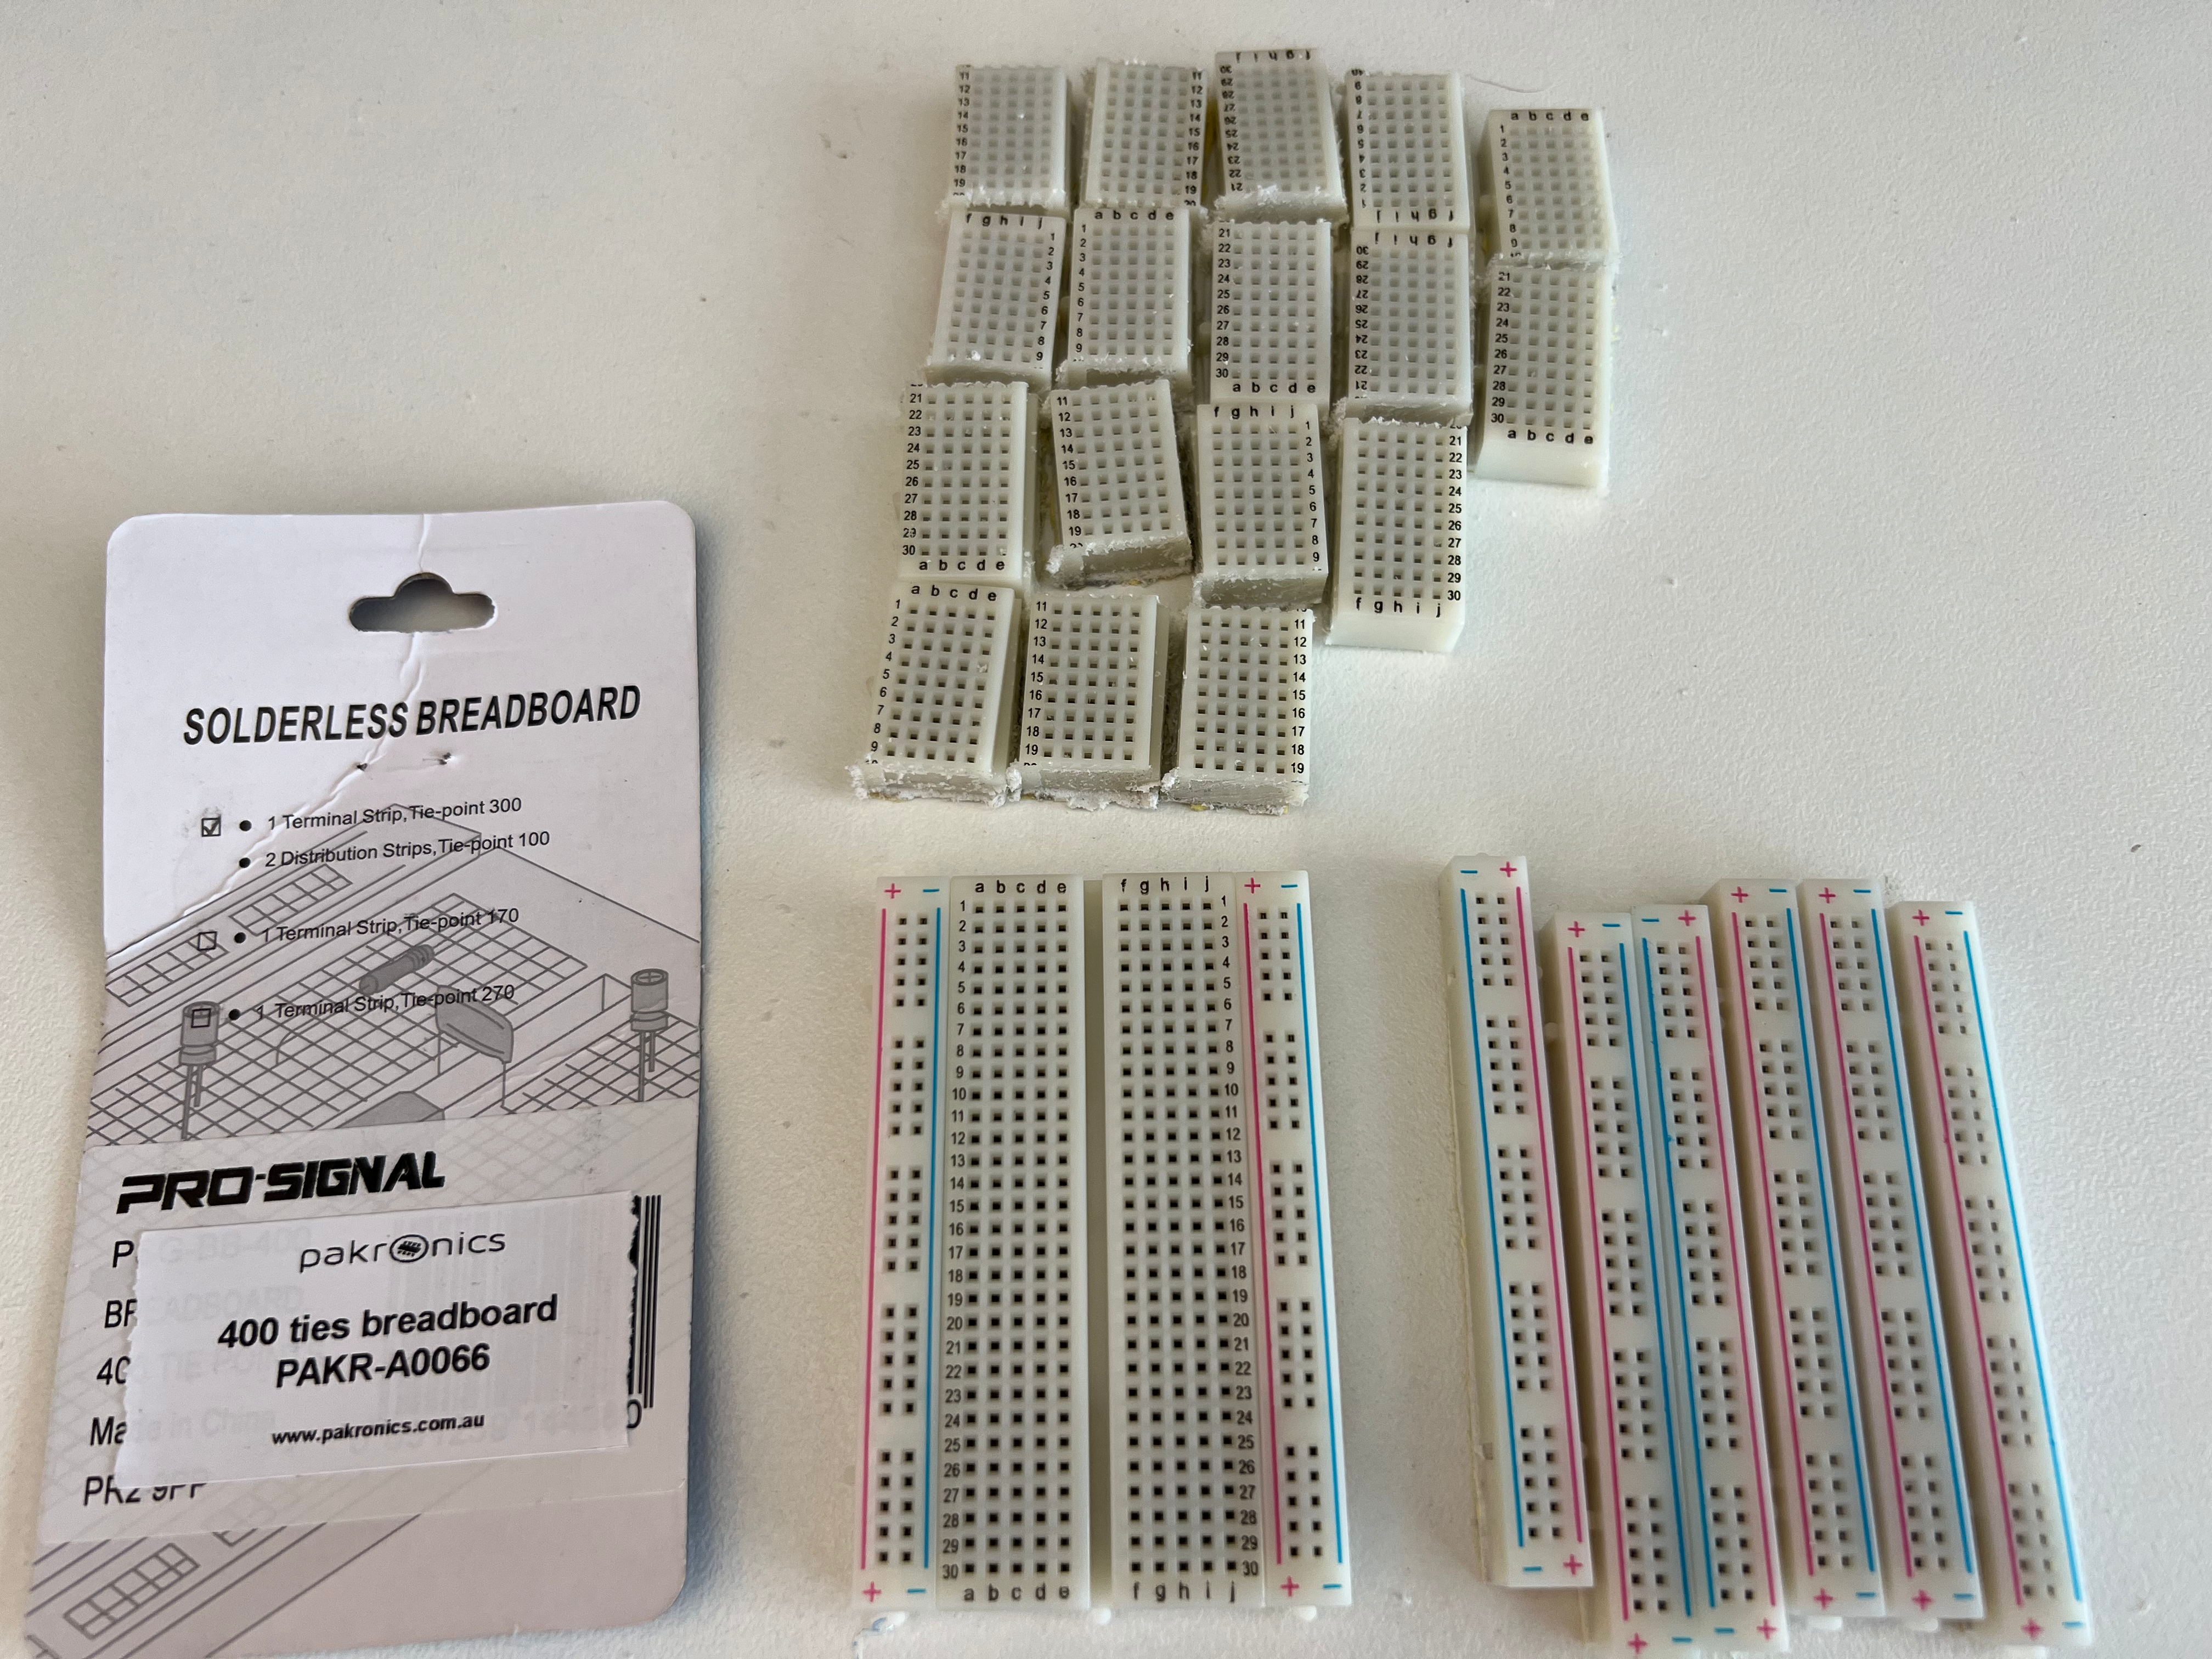
Purchasing at retail for the first trial
Amazon options in Australia:
Aus Electronic stores:
- Pakronics
- Jaycar
- Core Electronics
- STEM Tasmania:-)
3 - Research: IR Sensor to catch moving object
Need:
Toy racing cars run down a track, and we want to know how fast it takes to get from one end of a 5m track to the other.
Requirements:
IR Beam equipment at the Start and End of the track to record the start and finish times.
Raspberry PI computer to work out the time comparison and display on a screen.
Beam distance is about 20 cm
Learning:
Options:
Parts that might be needed for wire length:
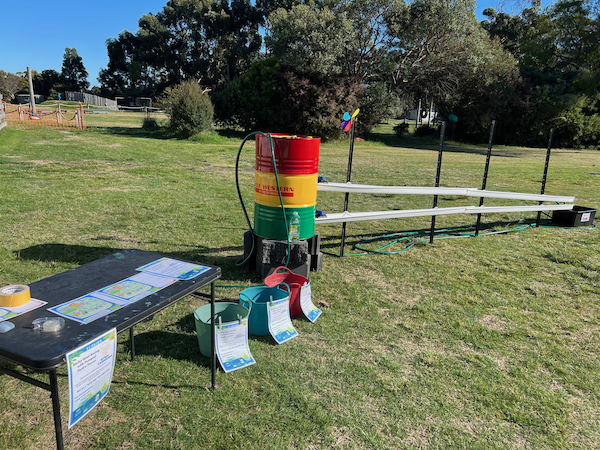
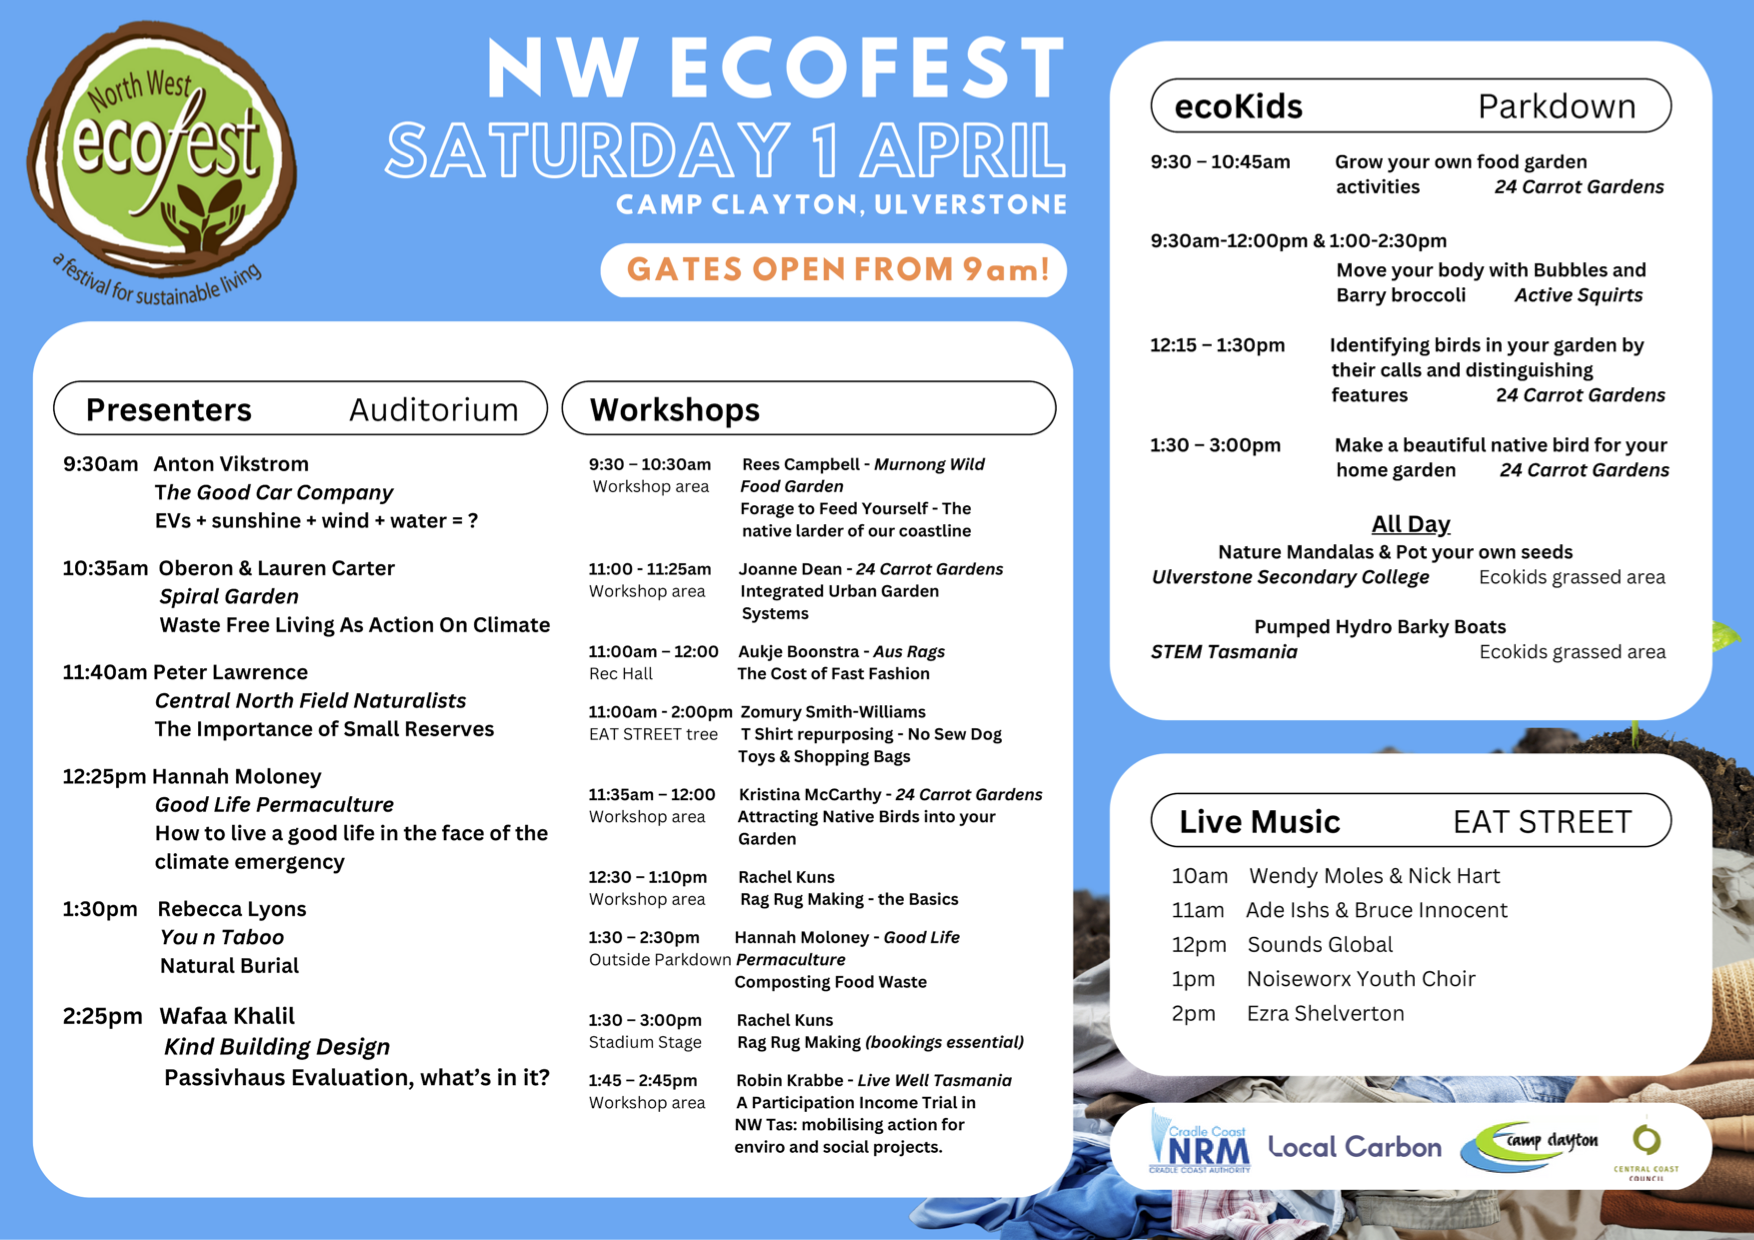
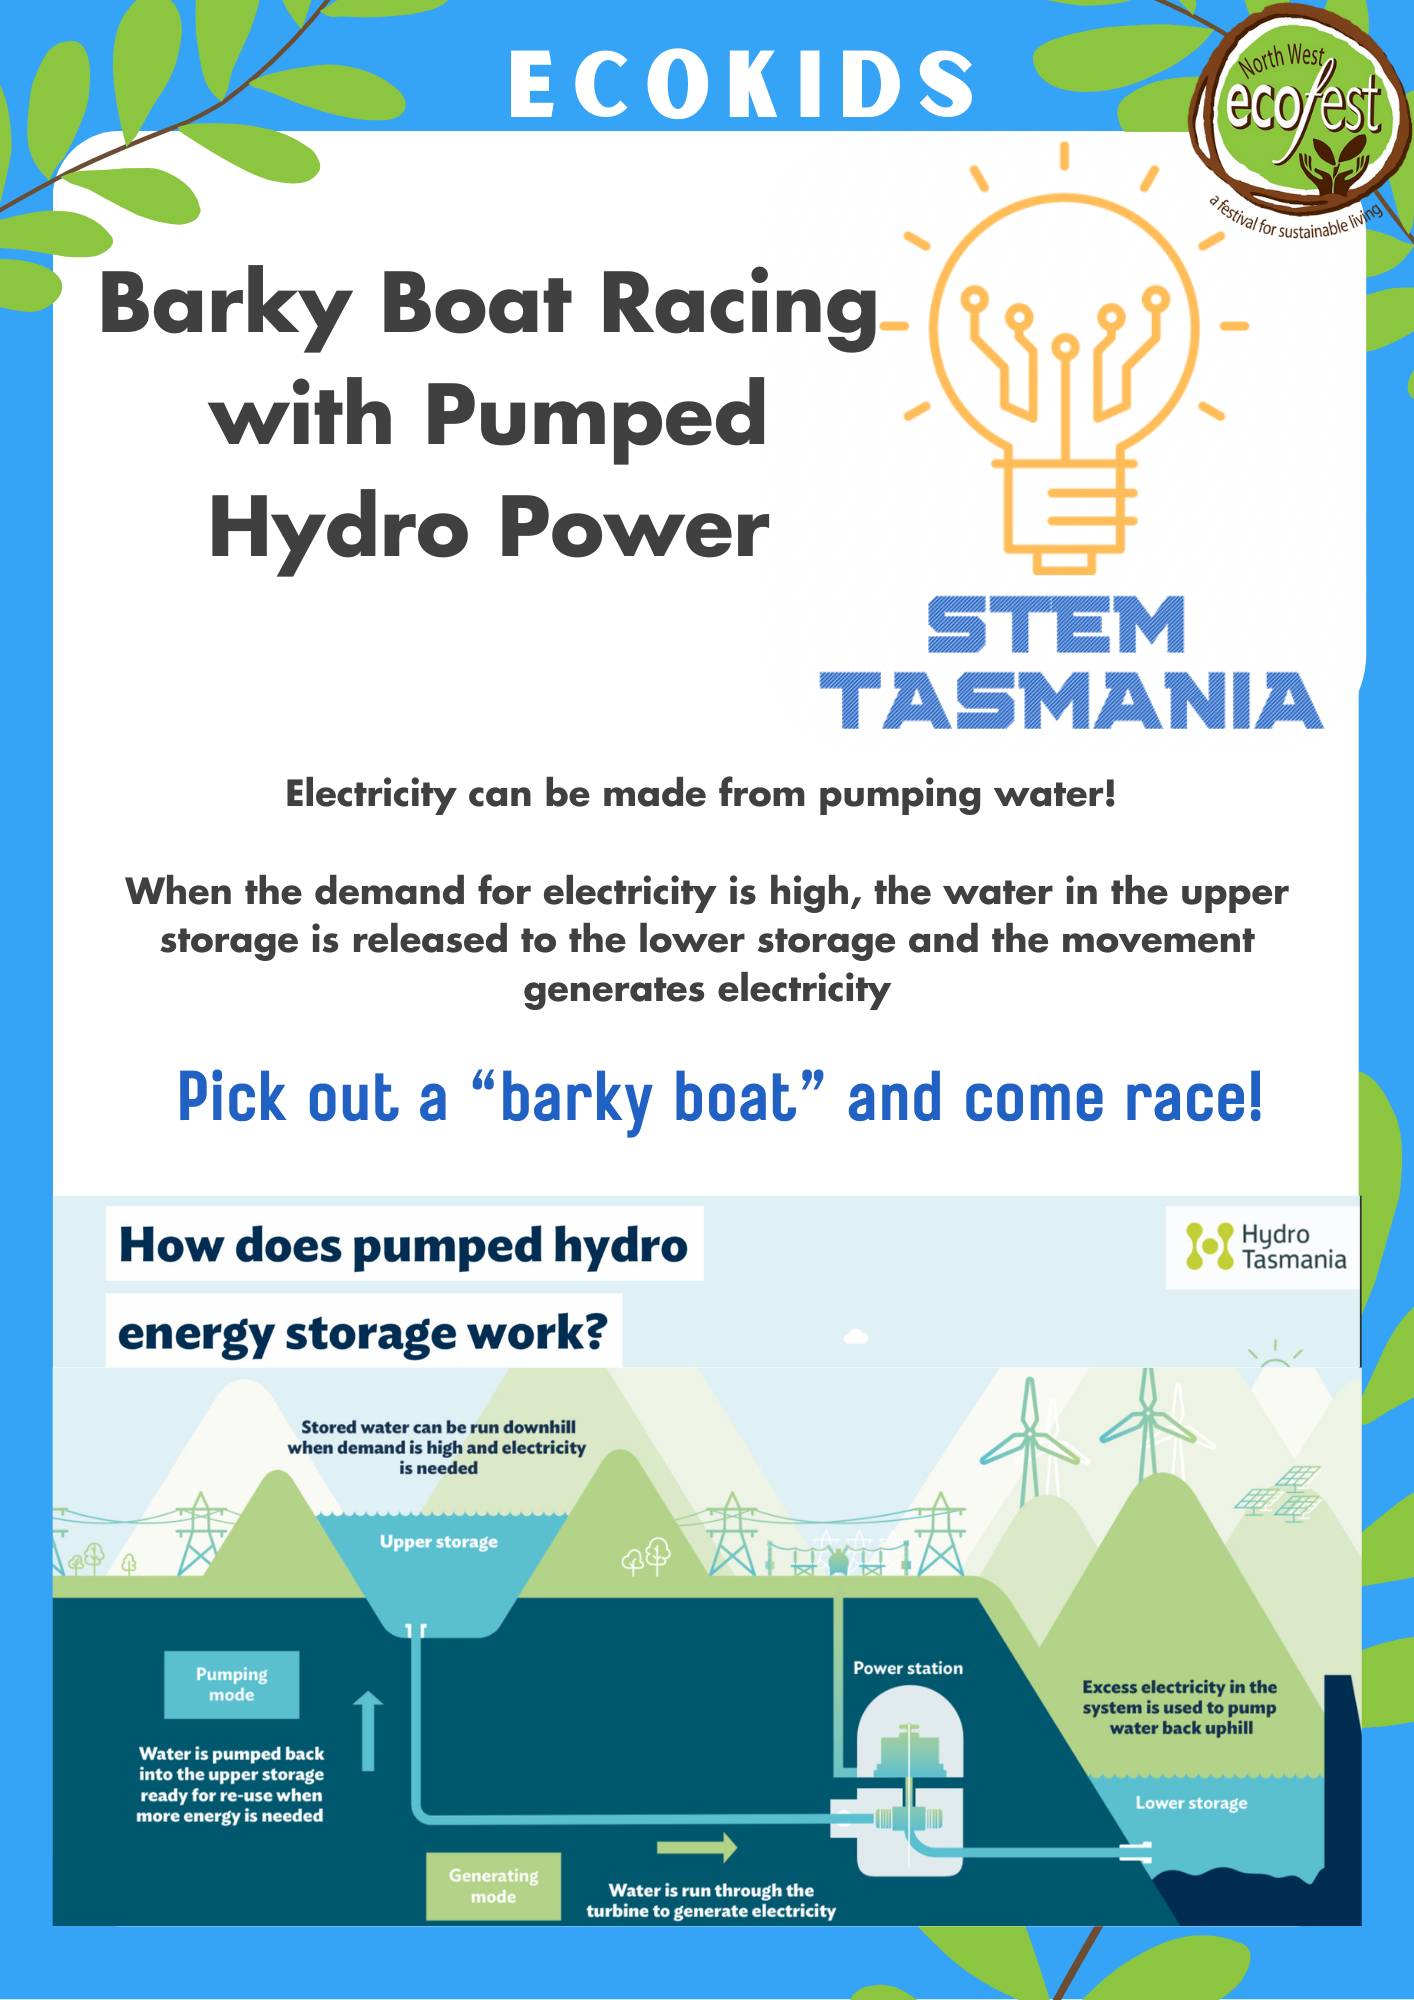
4 - ECOFest 2023 - STEM Hydro Battery Example
Demonstration of using Pumped Hydro as a Water Battery
ECOKids:
Grab 2 pieces of bark and place one in the top and one in the bottom.
Now if I turn both these taps on simultaneously, which piece of bark will get to the end first?
Adults and 8+ kids learn from this and usually make the mistake that the pipe with the downward flow will beat the flat pipe.
Younger kids have fun racing the boats.

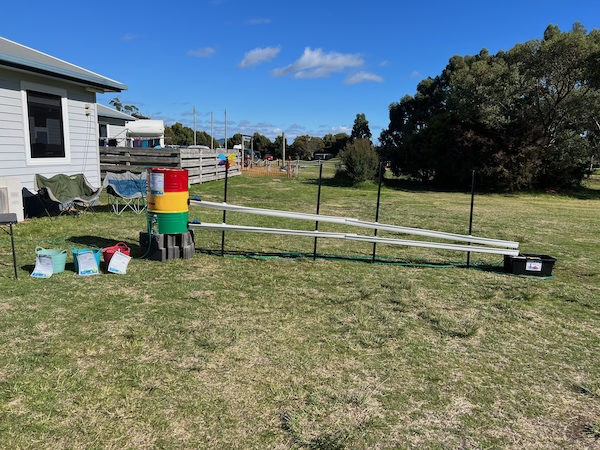
Equipment:
- Sump Pump and container.
- Stretch Goal Use - Fold-out Solar panels
- 2 x 2" Open/close Easy to use Tap - Done
- 2 x 200L Drums - Done
- 2 x Tank Outlets - Done
- 4 x Gutter for water run
- 4 x Star pickets and wire to connect the Gutter for the 6m run.
- Need capture Tank. or cutting 200L drum to size.. might be the cheapest.
Improvements:
Need to use a Plastic blue drum next time. Its surprising how quickly the oil drums rust with water standing in them.
Automatic pump start somehow, We Need a separate float that is lower to the ground.

TV News
WIN News

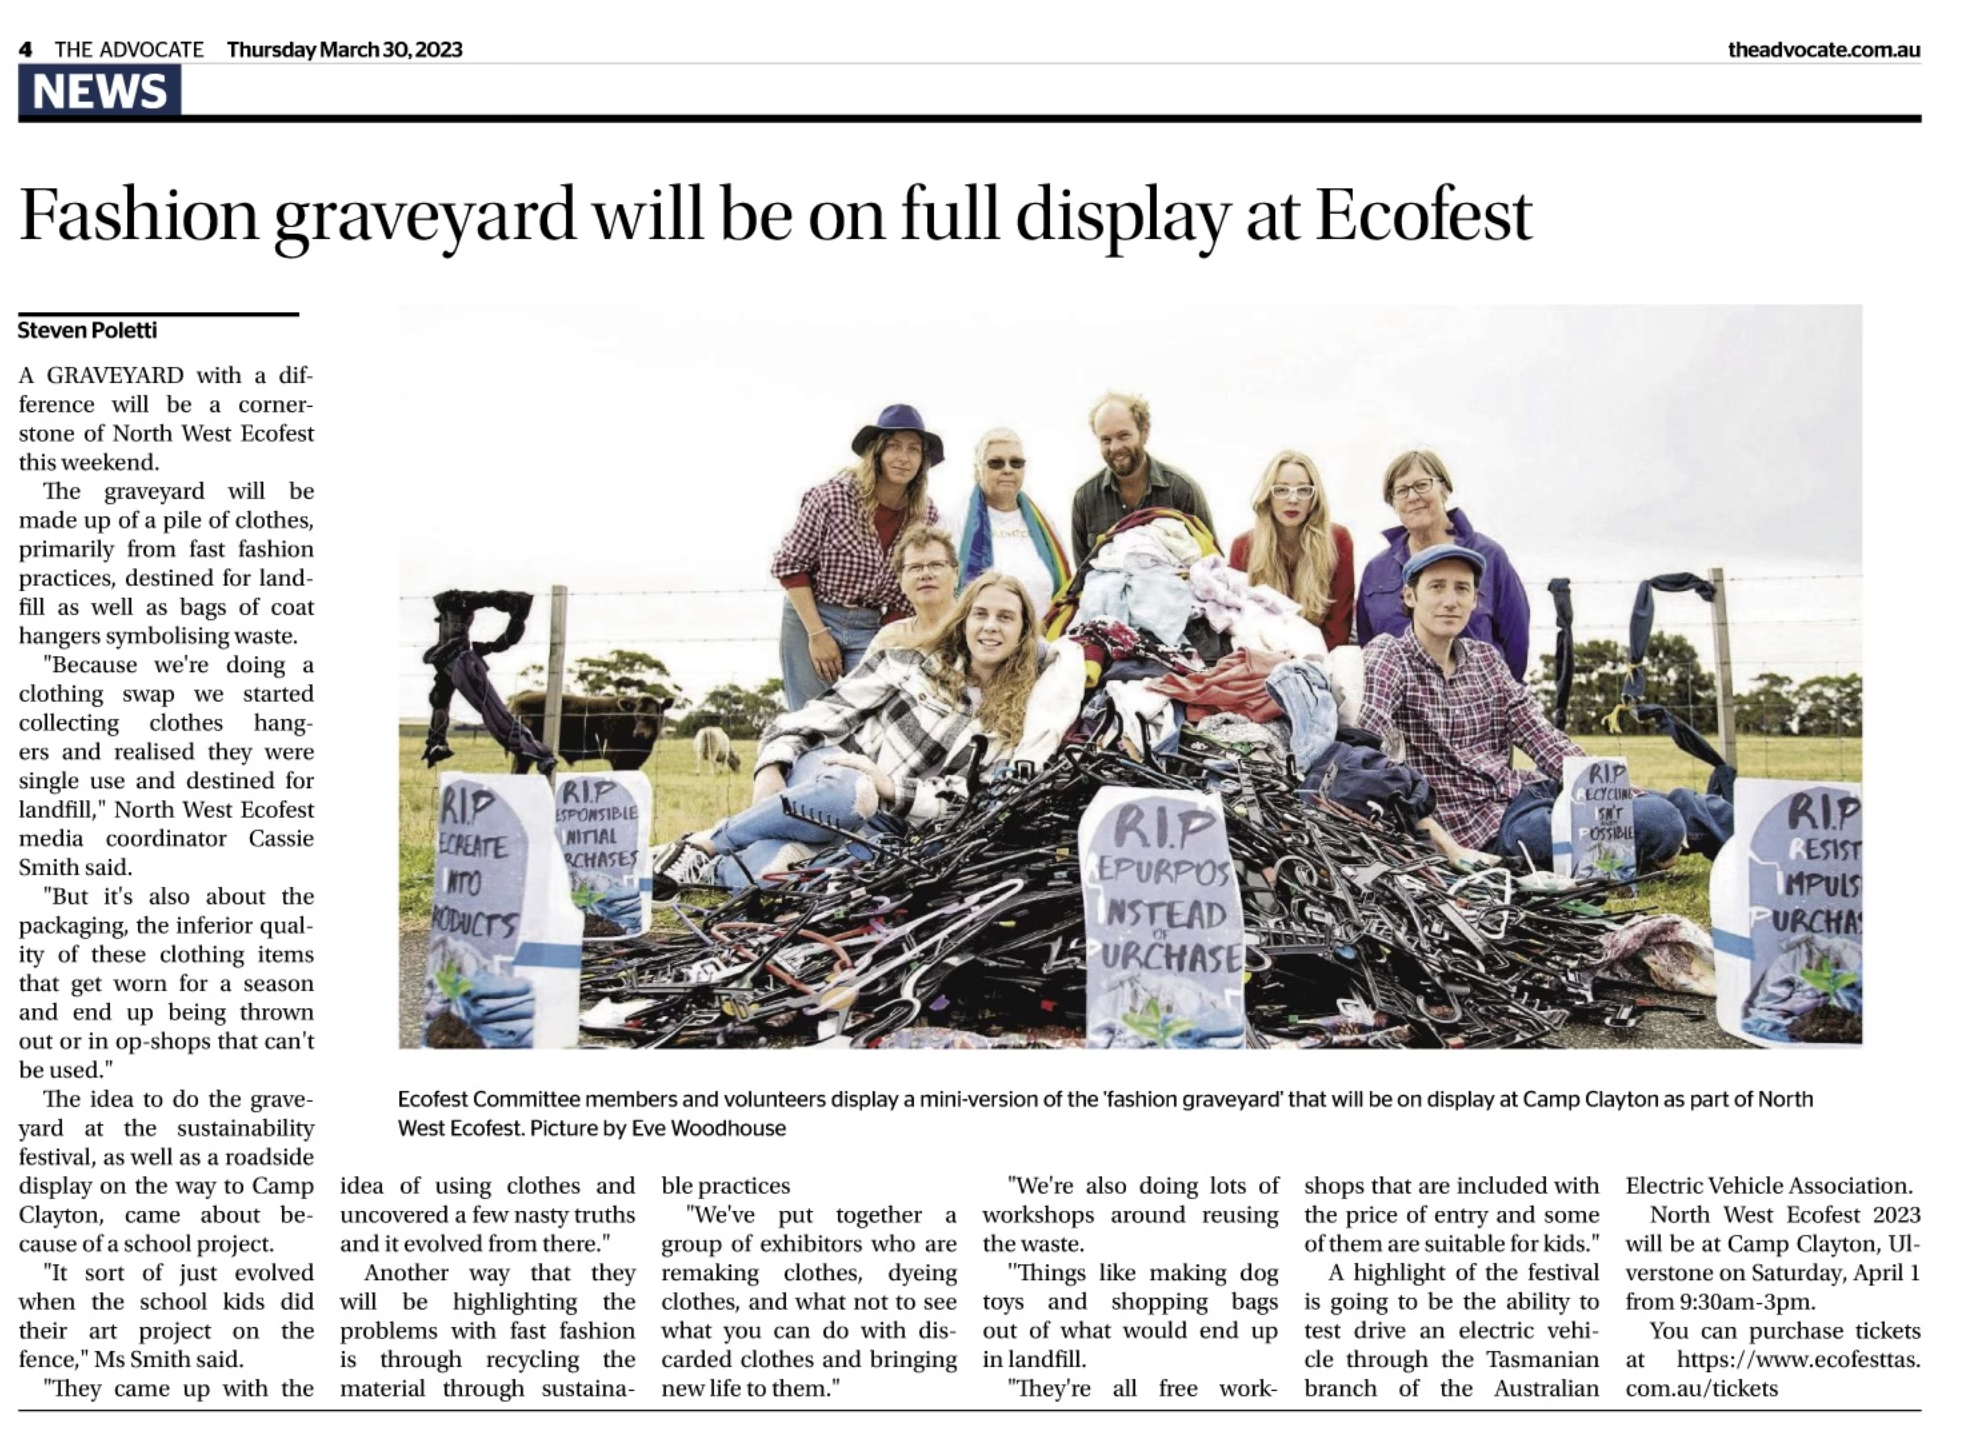
https://www.theadvocate.com.au/story/8144158/thousands-turn-out-to-annual-coastal-event-celebrating-all-things-sustainable/?src=rss

Time Taken:
12+ Hours
- 2023-04-01 8 hours demo + shutdown help
- 2023-03-30 2 Hours setup at ECOFest and help with ECOKids.
- 2023-03-28 2 hours Create in the backyard as a test. Cutting holds etc.
- 2023-03-27 Looking for a Drum. (THANK YOU, Island Wholesale Services in Ulverstone!)
- 2023-02-27 1 hour planning equipment and costs.
5 - North West Tassie Minecraft Information
Tasmanian Minecraft Groups:
https://minecraft.nwtassie.com/
Minecraft Java on Windows OS:
- Install software and load Minecraft Launcher
- Select Minecraft: Java Edition
- Select Play
- Wait for updates to download. Then Launcher will disappear.
Minecraft Bedrock on Windows OS:
- Install software and load Minecraft Launcher
- Select Minecraft for Windows
- Select Play
- Select Play in Minecraft
- Select Servers Tab.
Change Minecraft GameTag:
- Open Minecraft for Windows
- Click Settings
- Click Account
- Click Change Gametag
- (For me) Install Xbox Console Companion from Microsoft Store - Failed - There has been an error….
Australian Minecraft Cloud Server Providers:
What should I do on my first day/night of Minecraft?
On your first night in Minecraft, it’s important to find shelter and stay safe from the monsters that come out at night. Here are a few things you can do:
- Gather resources: During the day, try to gather as many resources as you can, including wood, cobblestone, and any other materials you come across. These will be useful for building and crafting later on.
- Build a shelter: Once it starts to get dark, use your gathered resources to build a simple shelter. This can be as simple as a small hut made of wood and cobblestone, or a more elaborate structure made of other materials. Just make sure it’s big enough for you to fit inside and that it has a door or other way to block out the monsters.
- Stay safe: Once you’re inside your shelter, keep an eye out for monsters. You can use torches or other light sources to keep them away, and you can also craft weapons and armour to defend yourself if necessary.
- Explore: If you’re feeling adventurous, you can try exploring the area around your shelter to gather more resources or find interesting things. Just be careful not to stray too far from your shelter, especially at night.
Overall, the most important thing on your first night in Minecraft is to stay safe and gather the resources you’ll need to survive and thrive in the game.
5 things to do in Minecraft
- Build and design: One of the most popular things to do in Minecraft is to build and design your own structures, from simple houses to elaborate castles and even entire cities. You can use a wide range of materials, including wood, stone, and other resources, to create whatever you can imagine.
- Explore: Minecraft’s vast and randomly generated worlds are full of secrets to discover and adventures to undertake. You can explore forests, caves, and other biomes, searching for hidden treasures and discovering new areas.
- Craft and gather resources: To survive in Minecraft, you’ll need to gather resources and craft items such as tools, weapons, and armour. You can gather resources by mining, farming, and other activities, and use them to create useful items that will help you survive and thrive in the game.
- Fight monsters: As you explore the world of Minecraft, you’ll encounter a variety of monsters, including zombies, skeletons, and creepers. You’ll need to defend yourself against these threats using weapons, armour, and other items, or risk being killed and losing your progress.
- Play with others: Minecraft is a great game to play with friends, either online or in split-screen multiplayer on the same device. You can work together to build and explore, or compete in challenges and mini-games. There are also many online servers where you can join communities of players and participate in all kinds of activities.
What can I do with Minecraft Bones?
In Minecraft, bones are items that can be found as drops from skeletons or obtained by breaking bone blocks. There are several things you can do with bones in the game:
- Tame wolves: You can use bones to tame wolves in Minecraft. To do this, simply select the bone in your inventory and right-click on a wolf. If the wolf is not already tamed, it will become your companion and follow you around.
- Craft bone meal: You can craft bone meal by placing bones in a crafting grid or crafting table. Bone meal is a useful item that can be used to fertilize plants and grow crops faster.
- Decorate your builds: You can use bones as decorative blocks by placing them in the world. This can be a good way to add some atmosphere to your builds, especially if you’re creating a spooky or haunted-themed area.
- Trade with villagers: In Minecraft, bones can be traded to villagers for various items, including emeralds, wheat, and other resources. You’ll need to have a surplus of bones to make the trade worthwhile, as villagers typically don’t value bones very highly.
Overall, bones are a useful resource in Minecraft that can be used for a variety of purposes. Whether you’re taming wolves, crafting bone meal, decorating your builds, or trading with villagers, bones are a valuable item to have in your inventory.
Where do you find woofs?
In Minecraft, wolves can be found in most forested biomes, including taiga, mega taiga, and forest biomes. They can also be found in snowy taiga biomes.
To find wolves in the game, you’ll need to explore these biomes and look for wolves roaming around. They can be found alone or in packs, and they can sometimes be seen attacking other mobs such as sheep.
Wolves are passive mobs, which means they won’t attack you unless provoked. You can approach them and interact with them by right-clicking on them with an empty hand or with a bone in your hand to try to tame them.
It’s also possible to spawn wolves using commands or by using a spawn egg in creative mode. However, finding wolves naturally in the game is usually more rewarding and adds to the overall gameplay experience.
What berries are in Minecraft?
In Minecraft, several berries can be found and used in the game. These include:
- Wheat: Wheat is a type of crop that can be grown by planting seeds in farmland. Wheat can be harvested by breaking the fully grown crop with a tool or by hand, and it can be used to breed animals, craft bread, and make other items.
- Melon: Melons are a type of fruit found in Minecraft. They can be found naturally in jungle biomes and grown by planting melon seeds in farmland. Melons can be eaten to restore hunger, or they can be crafted into melon slices, which can be used to make other items.
- Pumpkin: Pumpkins are a type of fruit found in Minecraft. They can be found naturally in most biomes, and they can also be grown by planting pumpkin seeds in farmland. Pumpkins can be used to craft pumpkin pies, or they can be placed on top of a jack-o’lantern to create a light source.
- Beetroot: Beetroots are a type of crop found in Minecraft. They can be found naturally in villages, or they can be grown by planting beetroot seeds in farmland. Beetroots can be eaten to restore hunger, or they can be crafted into beetroot soup, which restores more hunger than raw beetroot.
- Berry: Berries are a type of fruit found in Minecraft. They are found naturally in taiga and snowy taiga biomes and can also be grown by planting berry bushes. Berries can be eaten to restore a small amount of hunger, or they can be used to breed certain animals.
These are the main types of berries that can be found in Minecraft. Each type of berry serves a different purpose in the game, and they can all be useful for restoring hunger, crafting, and other activities.
How to take a copy of the Minecraft Screen/Display and save it as an Image?
Windows OS - Use the Windows + Shift + S keys, then use the mouse to select the Minecraft window.
Minecraft Commands
/tp Transport to a new location
5.1 - Minecraft Achievements
Things I’ve achieved in Minecraft

Coal House - Stone Age

5.2 - Minecraft Speedrun
Planning
In a Minecraft speedrun, your initial activities are crucial for setting up a successful and efficient run. Here’s a general guideline to get you started:
-
Food and Survival Essentials: Gather food as soon as possible. Killing animals like cows, pigs, or chickens can provide quick sustenance. Also, collecting beds for the Ender Dragon fight is important if you’re playing in versions where this tactic is applicable.
-
Iron and Coal: Look for iron ore and coal. Iron is essential for making better tools, weapons, and a bucket. Coal is necessary for smelting and torches.
-
Finding a Lava Pool: For the Nether portal, you need a lava pool. Use the iron to make a bucket and use the bucket to create a Nether portal using the lava pool and water.
-
Enter the Nether: Once in the Nether, your primary objective is to locate a fortress to obtain blaze rods, which are needed to make Eyes of Ender.
-
Ender Pearls: You’ll also need Ender Pearls, which can be obtained by bartering with Piglins in the Nether or by killing Endermen.
-
Finding the Stronghold: After getting blaze rods and Ender pearls, craft Eyes of Ender and use them to locate the stronghold.
-
Enter the End Portal: In the stronghold, activate the End portal and enter it.
-
Defeat the Ender Dragon: The final challenge of the speedrun is defeating the Ender Dragon. Use beds, arrows, and other strategies to defeat the dragon efficiently.
Remember, speedrunning Minecraft involves a lot of practice and sometimes luck, especially with world generation and resource distribution. Each run can be quite different, so adaptability is key. Good luck!
First Activity - Collect Basic Resources
Immediately gather wood from trees. This will allow you to craft basic tools like a wooden pickaxe.
Need: Crafting Table
4 Planks required
Need: Wooden Pickaxe
3 Planks
2 sticks
After getting wood, crafting a crafting table, then quickly upgrade to stone tools by mining stone.
Need 3 x Stone Pickaxe (In case it takes a while to find Iron)
3 Cobblestone
2 Sticks
Need Torches (for mining underground for Iron)
Dig for Coal
10 Sticks (1 stick per 4 torches)
6 - Hive STEM Club preparation
Preparation
Charge all batteries
* Charge 2 iPads for Spheros
* Charge 2 Spheros
* Charge 2 keyestudio Robots
* Charge AA Batteries for other Robots
Laptops
- ACER Aspire (Windows 11 Home); ACER Travelmate (Windows 10 Pro);
- Check powers on and charged.
- Confirm no Windows Updates are Pending (as this will slow things down)
- Check Wireless mouse is working.
- Remove Minecraft Education Edition (unless older kids)
Call Hive to get numbers: Phone: +61 3 6425 2839
- 2023-02-16: 4 Booked.
- 2023-02-23:
- 2023-03-02: 9 Booked.
- 2023-03-09:
Packing
1 Box of Magnet Tiles
3 Laptops plus my own.
3 iPads (2 kids plus mine as backup)
Pi WIFI Hotspot (Keyboard and Mouse)
Alexa Show - Ask participants what songs they want to listen to (need happy music vibes - otherwise, too quiet)
Magnets
Robots and Microbits with USB/Batteries.
At STEM Events
- Plug Pi WIFI In for Hot Spot when everything loads. Make sure online first.
- Plug in Alexa Show on Bench and connect/test WIFI. Play funky tech music.
- Plug in Laptops on Tables and connect to STEMClub WIFI
Load up Minecraft Education on two laptops and Login as needed.- Load up Microbit Programming makecode.
- Place Robots on each desk with Microbit and USB Cables.
- Place Magnets into an arrangement and Put two Spheros on ground, connect to two iPads and Sphero EDU.
- Place Monitor at Front and connect to My Laptop - Fire up Makecode or something.
After STEM Event
Document feedback
Email out event information, what everyone did and what is planned for following week.
Feedback/Review
2023-03-02
- Kids loved building K-Mart robots (are there more kits I can buy)
- Kids need gloves for pulling apart things.
- 9 participants doing different things is a lot of work. (need to change this)
2023-02-16
- Phone 5G WIFI wasn’t working well. Laptops were disconnecting due to limited connections and venue WIFI refused to load Minecraft Education maps.
- Due to above issues, laptops were not 100% ready when people arrived. Wasn’t a relaxed start.
- Also was quiet like a library, as everyone was focused on laptops. Need music vibe.
- Improvement: Build a Raspberry Pi WIFI Hotspot that will connect to Phone 5G and support more devices.
- Improvement: Arrive at 3PM for 3:30PM Start. Which means someone else brings kids.
- Improvement: Setup Alexa device for people to play with.
Time Spent on Prep/Post work here:
2023-02-22: 4 hours (prep laptops, working out minecraft education account setup; Pi Hotspot setup)
Reference:
7 - Night Light Electronics Workshop
Workshop to learn basic electronics and build a nightlight
The Starlight Nightlight workshop will build and take home an automatic night light using a LED (light-emitting diode) and a few basic electronic components. The project aims to teach students about basic circuitry and electronics while creating a functional and practical device. The project involves constructing a simple circuit that connects the LED to a battery through a transistor and a light sensor. The Starlight Nightlight workshop is a great introduction to electronics and a fun way to create a useful device.
Time: I’m thinking 1.5 hours
Date: 21st April 10:30.
Students: 10 to 12 (happy for parents to stay, help and join in the fun)
Example completed unit:
https://youtu.be/i29pQg0IPx8
Participants will learn:
- How a LED Works and different types of LEDs
- What do a Resistor, Transistor, and Light-dependent resistor do in a circuit.
- What are Ohms Law and Kirchhoff’s Voltage Law
- Series and Parallel circuits
- How to connect a LED to a battery correctly and safely
- Why transistors changed the world and how we use them
- How to build a circuit to monitor light levels and activate a Night Light
Demo Circuit:
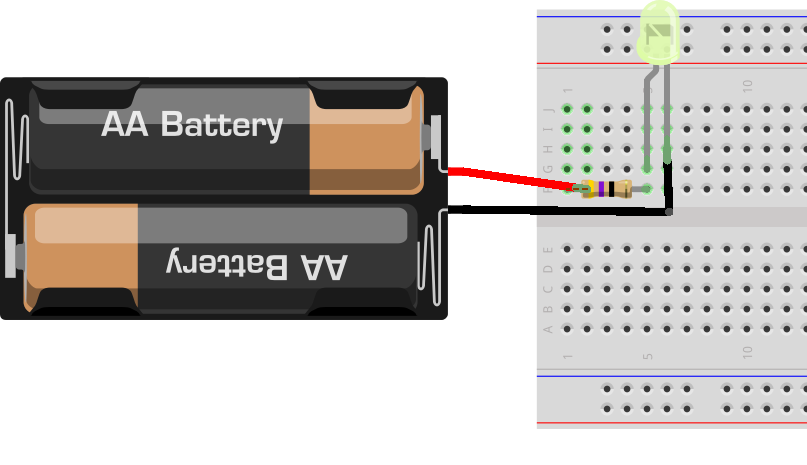
Step 1
Make a LED Light using the battery.
Parts:
Tasks:
- Connect Battery, LED and 100 Ohm resistor in series.
- Measure Voltage at Battery
- Talk about Kirchhoff’s Voltage Law = KVL
- Let’s find the voltage over the resistor by measuring the LED
- Measure Voltage at LED
- Use the above to work out what the resistor voltage drop is.
- Measure to confirm.
- Now we have the Voltage and the Ohms, let’s discover the mA using Ohms Law
- What is mcd? Lets try different types of LEDs and see the brightness difference
Step 2
Make a voltage divider (Just like the loop KVL), only this time using the Light Dependent Resistor
Parts:
- 3V/2.4V Battery Pack
- LED
- TRIMPOT 103 10K Potentiometers
- LDR CE09439 Light-dependent resistor
Tasks:
- Connect Trimpot and LDR in series to the battery
- Connect LED between Trimpot and LDR then to Battery
- Does the LED light?
- What if the LDR is covered?
- What if the TRIMPOT is adjusted?
- What are we doing?
- We are making a Voltage Divider.
- Why does the LED go out when the LDR sees the light?
- Can we measure the voltage across the LED? it’s small.
- How can we make the LED bright again?
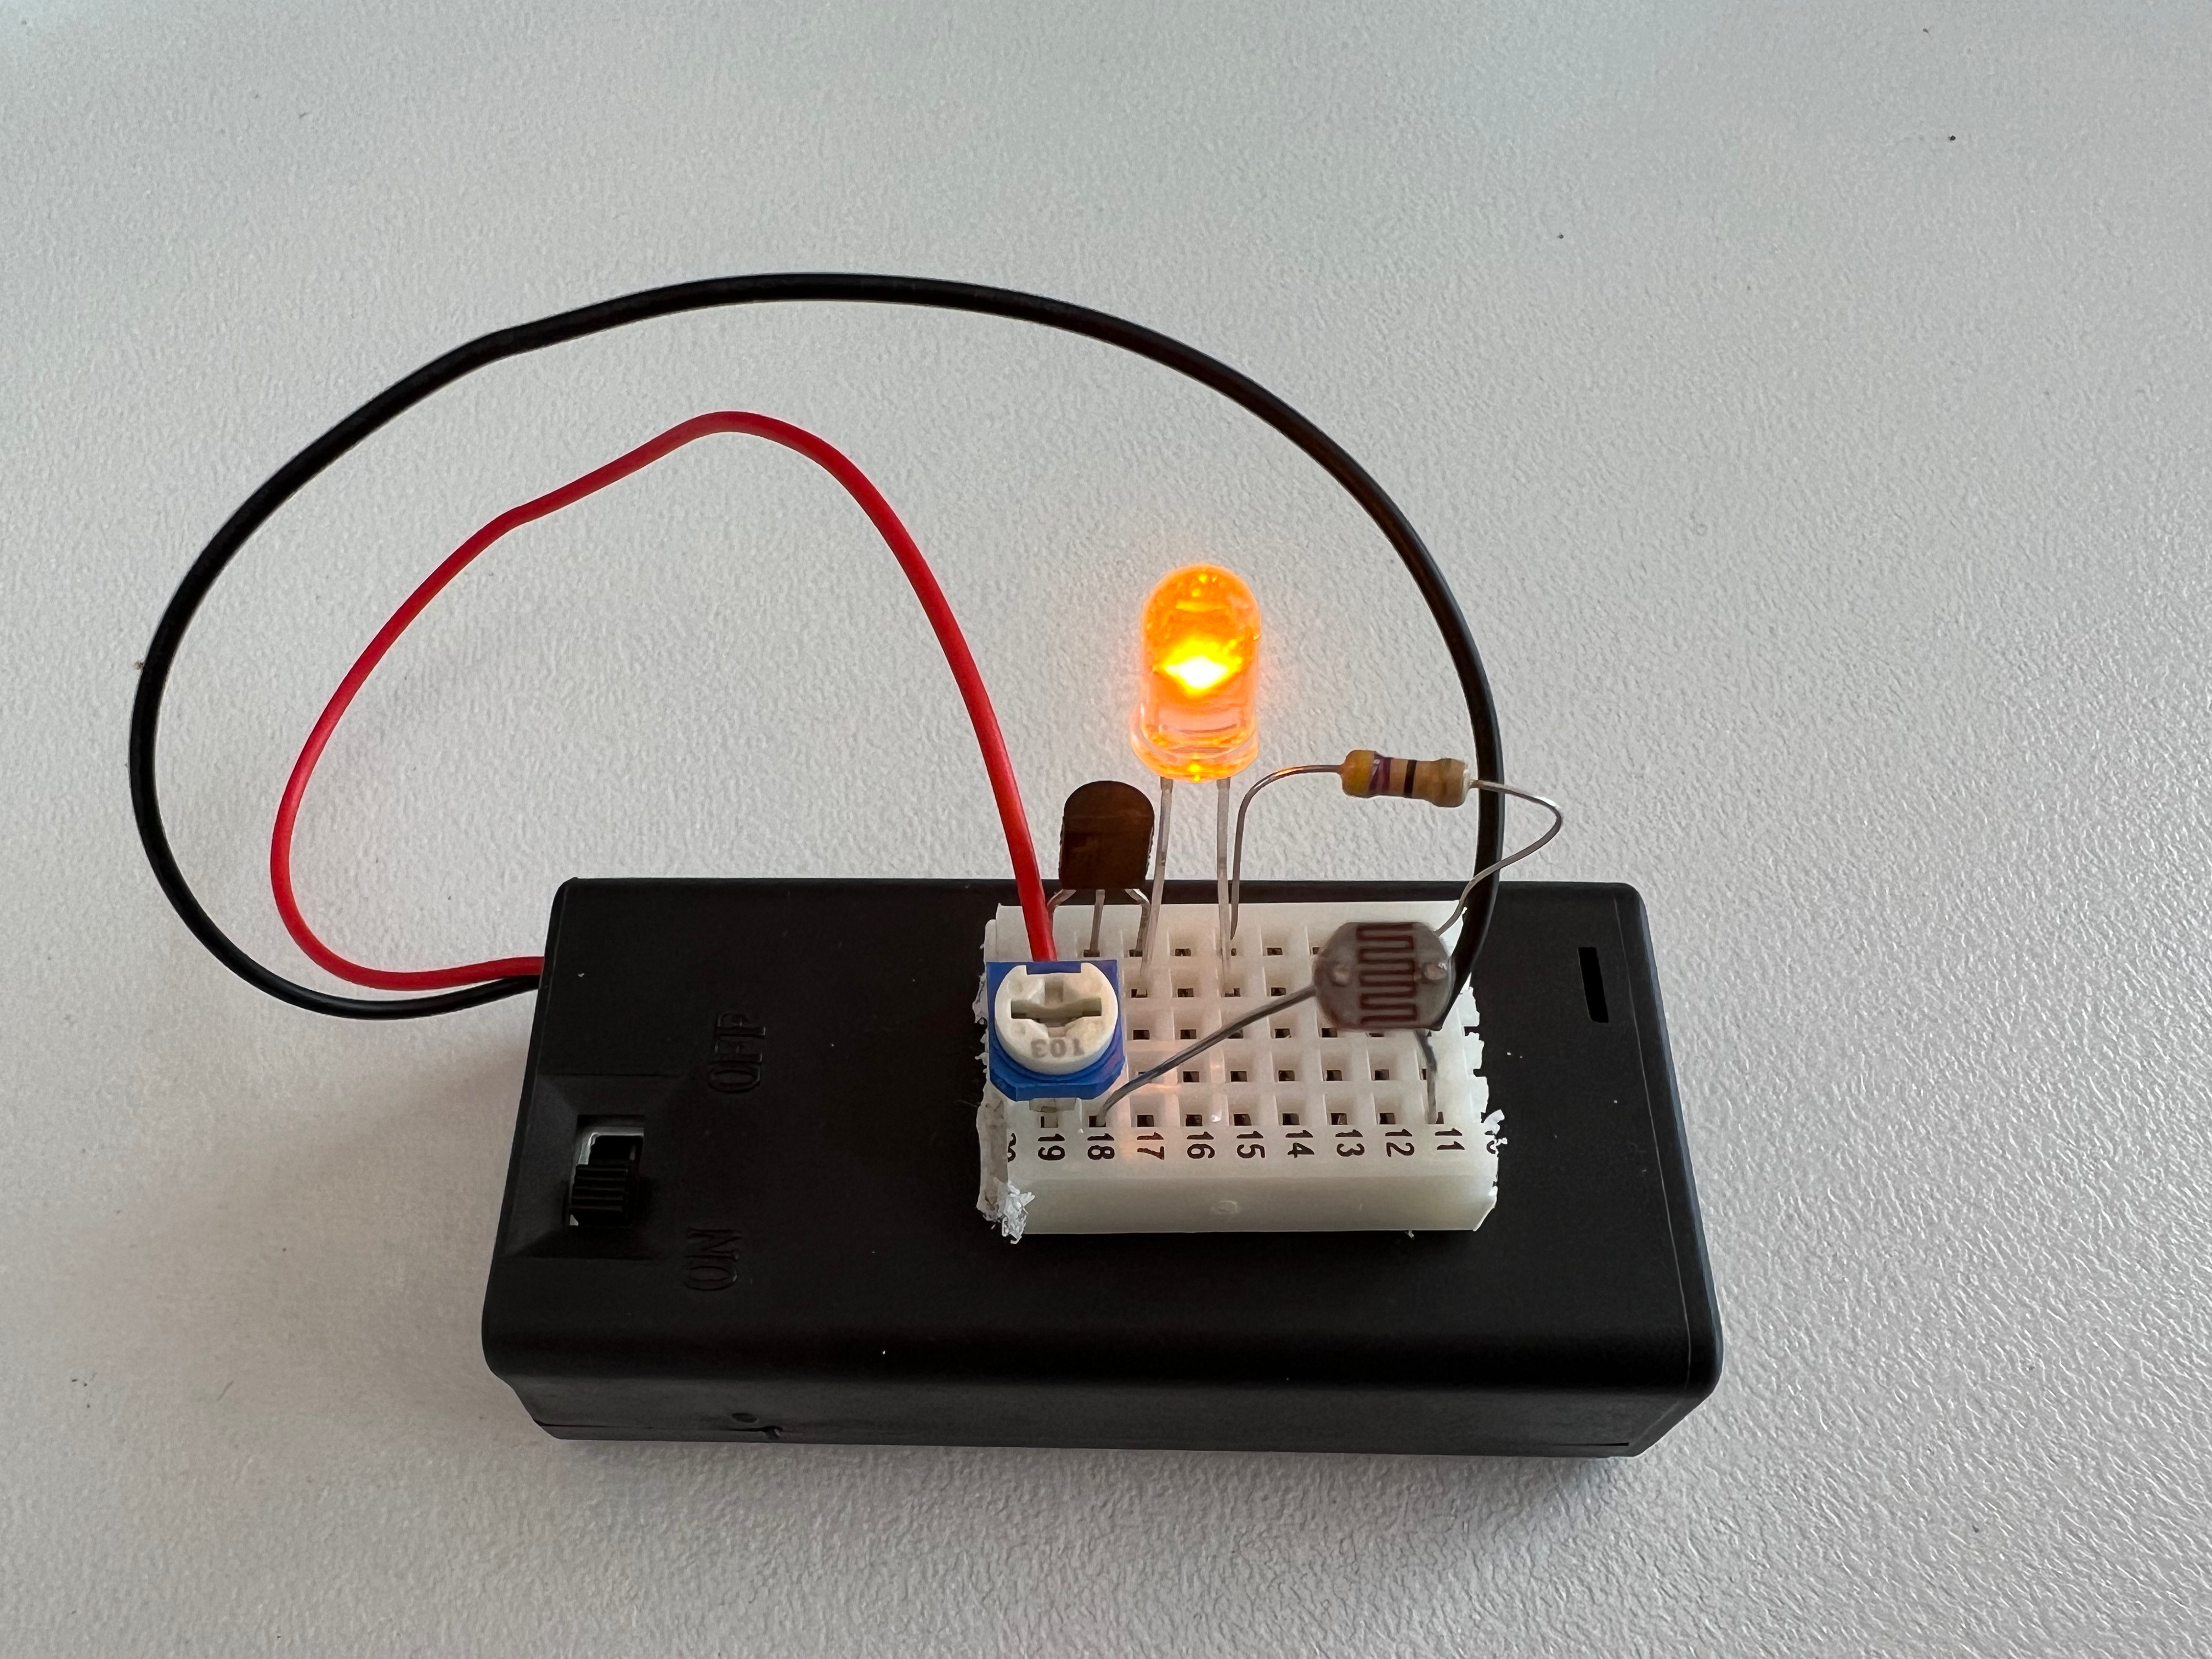
Step 3
Amplify the voltage/current to full levels needed by the LED
Parts:
- 3V/2.4V Battery Pack
- LED
- TRIMPOT 103 10K Potentiometers
- LDR CE09439 Light-dependent resistor
- Transistor PNP
- 100 Ohm Resister
Tasks:
- Lets remove the LED from the voltage divider
- Insert the transistor
- Insert the Resistor to limit the current as in Task 1
- Insert the LED.
- Lets adjust the voltage divider (if needed)
- Now we can set the light level.
- We have an Automatic Night Light.
Step 4
Finish it up for use
Tasks:
- Unstick the backing
- Place on the battery pack
- Put a cover over it?
Ohms Law:
At 2.4V, what will be the mA using 47 Ohms:
First Project cost:
$64.70 Multimeters x 6
Purchase of many parts for learning that didn’t end up going in this kit.
Take-home kit:
$1.70 3V Battery case
$0.28 LDR
$0.40 Yellow Bright LED
$0.15 Potentiometer (102 or 103. 203 is too high)
$0.57 PNP Transistor (Cheaper at core-electronics doh!)
$1.20 Breadboard
Total $4.30 per person
Shipping
The small components can go into the battery compartment. Then print with light cardboard and fold in half over it to make a printed pouch.
From Website:

Purchasing test parts from local Jaycar store. Cost = ?
If purchased from Jaycar in Tasmania, what would be the cost?
Purchasing parts from digi-key wholesale
Cost options for bulk
Needed per person: $7 per person?
- $0.40 Mini 25 Points Breadboard Solderless Prototype
- $2.00 2 x AAA Battery box with switch
- $0.11 Photoresistor
- $0.75 Transistor
- $1.25 1. Potentiometers
- $0.03 30 Ohm Resister
- $2.00 LED Bright 6300mcd (lots of options here)
- $1.10 Battery x 2
Reference:
First version:
LED - Long lead is positive.
LED Tests:
Super bright Yellow on 3V AA batteries.
47 Ohms - still very bright. Enough to leave spots on eyes.
TRIMPOT:
miniature “Trimpots” have codes to represent their value. For example, 101 (100 Ohm), 102 (1K), 103 (10K), 104 (100K), 105 (1M)
- 103 should be a match for the LDR at 10-20K
LDR CE09439 Light dependent resistor
- Resistance @ 10 Lux = 10-20k ohms
Transister:
- PN2907A PNP (purchased 20)
Learning Program:
Use the LED (with 47 Ohm resister) as the indicator to demo voltage divider.
Last steps:
Slides
Time Spent:
- 2023-04-15 4h Slides and learning electronics.
- 2023-04-03 2h Developing training material
- 2023-03-24 1h Building first kid
- 2023-02-10 2h Initial research and product investigation.
- 2023-02-10 1h research cost to buy from Leading Edge - Jaycar reseller for a first test run.
8 - iPad Applications
This is where I’m tracking applications our kids have on their iPads.
Using Abraham
- ABC Kids - Bluey etc
- Minecraft Education
Using Aristotle
- Tynker Jr
- Australian Broadcasting Corporation - Playschool Playtime
- EDOKI Academy - Crazy Gears
- Preschool
- Checkers
- Kodable
- Tic Toc Time
- Kid Pix 5
- Montessori together
- 1st Operations
- ABC Art Maker
- Crazy Gears
- Math City
- Khan Kids
- Feelu
- Due Kids
- Joy of reading
- Chess 3D
Removed
- Australian Broadcasting Corporation - ABC Kids - Bluey etc - need more interactivity. Too passive.
Completed Abraham
-
2022-Age 7
-
2021 and before:
- Code Karts - Pre-coding logic
Completed Aristotle
-
2023-Jan:
*
-
2022-Age3:
- Triple Zero Kids Challenge
9 - CO2 Sensor
Raspberry Pi CO2 Sensor
Sensor Options
11 - MicroBit
What is the Micro:Bit
The Micro:bit is a small, portable computer that is specifically designed for use in educational settings. It was developed as a collaboration between the BBC and a number of technology companies, with the goal of providing an easy-to-use platform for young people to learn programming and other computer science concepts.
The Micro:bit has a number of features that make it well-suited for educational use. It has a small, compact form factor, making it easy to carry and use in a variety of settings. It also has a number of built-in sensors and inputs, including a small screen, a number of buttons, and sensors for detecting temperature, light, and movement.
The Micro:bit is programmed using a simple, block-based programming language called MicroPython. This language is designed to be easy for beginners to learn, and allows users to create simple programs and control the various features of the Micro:bit.
Overall, the Micro:bit is a useful tool for introducing young people to the concepts of computer science and programming, and can be used in a variety of educational settings to teach these concepts in an engaging and interactive way.
Hive Workshop
We will be using bitlink kits to complete the training modules.
First Set of Activities are for Children and Adults who have not used the Micro:Bit before or have a very basic understanding. We discuss some of the Micro:Bit features and then create 3 programs as a group to:
- Connecting the Micro:Bit to the computer
- Write text and numbers on the screen.
- Using buttons to activate commands
- Measure light levels
- Create a bar graph to measure light over time.
Laptop and Micro:Bit are provided per 2 people.
If your child can already programme the Micro:Bit without help and knows how to display text on the screen and other functions, this workshop might be a little boring:-)
Workshop Websites to teach from:
Kits
Educational Resources
LED display
I’ve found the LED Display on the micro:bit to be multiplexed. Meaning not all the LEDs are on at any one time, which the human eye doesn’t notice. However the video camera at even lower frame rates seems to pick it up and not show the complete screen. This means when recording a demo, the Simulated environment is best.
12 - Pi HIVE racetrack monitor
Hive Requirements:
- Drive 2 Displays with times
- Leaderboard - Best over last 7 days.
- Ability to enter 3 letters for high score.
Issues:
One receiver wasn’t working. After an hour or two of playing and trying to debug, I found the neg/gnd wire right at the receiver had broken.
Keyboard Commands:
ESC - Reboot code
d - Debug ON
r - Reset Score/
Making changes
Turn on Phone open Personal Hotspot.
Get Keyboard and mouse from Storage room
Connect laptop to Phone
Open iterminal
ssh hive@172.20.10.5
Pi Software:
Login - hive
Password - ulverstone
Keyboard and Mouse:
The wireless keyboard LED doesn’t turn on, the keys work.
The mouse needs the small switch under it to be ON.
Terminal:
Control + Shift then “+” multiple times to make the screen text larger to see from afar.
Change desktop wallpaper
- Right click on the desktop and select Desktop preferences
- There are two tabs, each for one monitor.
- Click on the box next to Picture to select a new image.
Pi Initial Setup
Audio Config
sudo raspi-config
System Settings
Change Audio Output from 3.5m jack to HDMI Output
Monitor configuration
- Pi logo->Configuration->Monitors
- Make sure the screen layout matches the physical monitors.
- Pi logo->Preferences->Raspberry Pi Configuration->Display
- Turn off Screen Blanking. - We don’t want the monitors to turn off.
VNC and SSH
Menu > Preferences > Raspberry Pi Configuration > Interfaces
Turn on SSH and VNC
VNC Password “science”
Reference: https://medium.com/@thedyslexiccoder/setting-up-a-vnc-screen-share-on-a-raspberry-pi-and-a-mac-10c1635df5dc
Rotate Desktop Images
https://github.com/varietywalls/variety
To change the wallpaper, please add/remove files in the Pictures folder that is in the home directory.
Sensor Setup
The sensors can be powered by 3.3V or 5V. Due to the long length of the wire from the PI to the first sensors, 5V has been chosen from the 5V supply on the Pi Board.
The Collector/Receiver will pull the signal wire DOWN/UP when the beam is broken.
Testing
Use a mobile phone camera to confirm there is power to the sensors. The IR light bean can be seen with the phone camera.
Audio
aplay CrowdCheer.wav
Signal from sensors
Orange - Left Track
Green - Right Track
PIN 7 - Right Finish
PIN 13 - Left Finish
PIN 11 - Left Start
PIN 15 - Right Start
Git setup
All configuration files live in ~/Scripts
- git add -A
- git commit -m “what happened”; git push
Personal GIT:
Power to sensors
CAT 5 Blue is 5V to both Transmitter and Receiver. This is due to the length of wire.
Blue/White GND from Transmitter
Green/White GND from Collector #1
Orange/White GND from Collector #2
Parts used:
- Raspberry Pi Model B 8GB (provided by Hive)
- Heat sink kit $3.75
- Micro HDMI to HDMI 2m $11.32 * 2
- Case - Red and White $11.78
- PSU - Pi official USB-C $16.50
- 32 GB Storage MicroSD $29.40
- Mouse and Keyboard $40.13
- IR Break Beam Sensor * 6 - $91.50
Total cost minus Labour: $215.70
Wiring to sensors:
CAT 5 Ethernet cable
Blue - Positive 5v to IR Transmitters.
Blue/white Neg 5V to IR Transmitters
Log:
2023-07-25 Attach Power wires to 5V.
Time Committed:
- 2023-07-25
- 5 hours - Researching, purchasing, and building Pi.
13 - Pi Audio Player
Pushing a button will play an Audio file. Pushing another button will stop the audio playing and start the next audio file.
This is for an interactive museum display, the device will play recordings of people interviewed as part of the display.
Pi headphone audio port will be connected to computer speakers.
Code:

#!/usr/bin/python3
import pygame
import RPi.GPIO as GPIO # Import the Raspberry Pi GPIO Library
#Stores objects with music
sounds = [0,0,0,0] # 4 areas of memory ready for audio objects
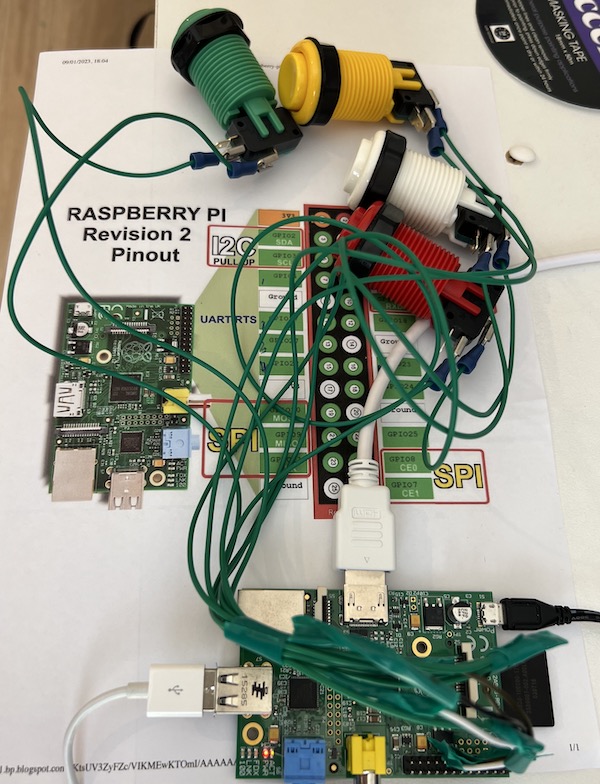
pi_pins = [7,11,13,15] # This is the 4 pins we are monitoring for button pushes
def button_callback(channel):
# Print out the Pi PIN that detected the 3.3V
# print(channel)
# Print out the location in the list. Used for music
pi_pin_index = pi_pins.index(channel)
print("Button was pushed on PIN:" , channel, "Connected to mixer index ", pi_pin_index, " Press Enter to quit and load Login Prompt. ")
# Make sure all sound is stopped. If someone pushes button during audio from another file
for sound in sounds:
sound.stop()
# Play sound
sounds[pi_pin_index].play()
# Setup GPIO Board settings
GPIO.setwarnings(False)
GPIO.setmode(GPIO.BOARD)
# Set pins to be INPUT and down
for pi_pin in pi_pins:
GPIO.setup(pi_pin,GPIO.IN, pull_up_down=GPIO.PUD_DOWN)
# Setup pin event monitoring
GPIO.add_event_detect(pi_pin,GPIO.RISING,button_callback, bouncetime=1000)
pygame.mixer.init()
# Load in the audio files. We do it this way to make sure we load the 4 into memory and not read the SDCARD every time the audio is changed.
# Load in the WAV audio files. Sound module ONLY supports WAV and not MP3:-(
sounds[0] = pygame.mixer.Sound("/boot/1.wav")
sounds[1] = pygame.mixer.Sound("/boot/2.wav")
sounds[2] = pygame.mixer.Sound("/boot/3.wav")
sounds[3] = pygame.mixer.Sound("/boot/4.wav")
# Pause Script for Input. As everything is a callback function, we only need to wait.
message = input("Press Enter to stop Audio Button App and cleanup Application. This will load Login prompt:")
GPIO.cleanup()
The .bashrc file will start the python script upon login.
14 - Pi WIFI Hotspot
At the STEM Club - The building WIFI isn’t great and Minecraft Education has issues downloading Maps. The alternative is to use a 5G Phone as Hotspot, this works until the number of active users limit is reached. And it requires the Phone to stay in one place.
To solve this, a Raspberry Pi is used as a Hotspot WIFI Repeater, taking the data from the iPhone 5G and sharing it with NAT to the room.
Required:
Raspberry Pi computer.
5G phone
WIFI Dongle (We are using BrosTrend AC650 USB Wi-Fi Adapter)
Steps to setup:
Connect builtin WIFI to 5G Phone
Confirm the Internet is connected and websites come up.
Make sure Pi is updated:
sudo apt update
sudo apt full-upgrade
sudo shutdown -r now
Install WIFI USB Dongle Software for AC650
wget deb.trendtechcn.com/install -O /tmp/installwifi.sh
chmod +x /tmp/installwifi.sh
sudo /tmp/installwifi.sh
Had errors on installation, but this may have been due to a kernel update. I should have rebooted after the updates.
Reboot - Both WIFI Adapters are connected to the WIFI.
sudo rasp-config
Advanced
Network settings
Change to Network Manager
Save and reboot
Use onboard WIFI to connect to the local network.
Use USB Dongle as WIFI Hotspot through the Network Menu bar.
Perfect!
15 - Notes on Purchasing Laptops
For Minecraft Education and STEM Coding, 10+ Laptops are needed for the students to use. They don’t need to be fast.
Preferred Specs:
- 15" Screen. Making sure everyone can easily see it and drag code blocks around.
- 8GB of Memory. This helps older laptops run faster and I’ve found that Laptops with 8GB are generally better quality ie not the budget/cheap ones when they were originally purchased.
- Windows 10 or better.
New Laptops:
Preparing a Windows 10 Laptop for STEM Use
- Connect to WIFI
- If this is a fresh Install - enter Windows Email Login - But we need to turn off Adverts etc.
- Install all Updates - If it’s been off for a while, this may take many hours and require rebooting to force updates to install.
- Remove all Apps not required - As these are older laptops, need to keep things quick.
- Unlink One Drive - Don’t download my files, also speeds up background processing.
- Install Minecraft ?
- Install Minecraft Education - https://education.minecraft.net
- Open EXE downloaded. Next, Next, Next. Add Desktop Shortcut.
- Watch for software installs behind the scenes. And Approve.
Preparing a Windows 7 Laptop for STEM Use
- Go through the New setup screens (Laptop was wiped)
- Connect to WIFI
- Oh its Windows 10. Skipping.
16 - MicroBit Robo:Bit MK3
https://4tronix.co.uk/blog/?p=1832
Programming Robobit Buggy in Makecode
https://4tronix.co.uk/blog/?p=1872
Makecode Editor
https://makecode.microbit.org/#editor
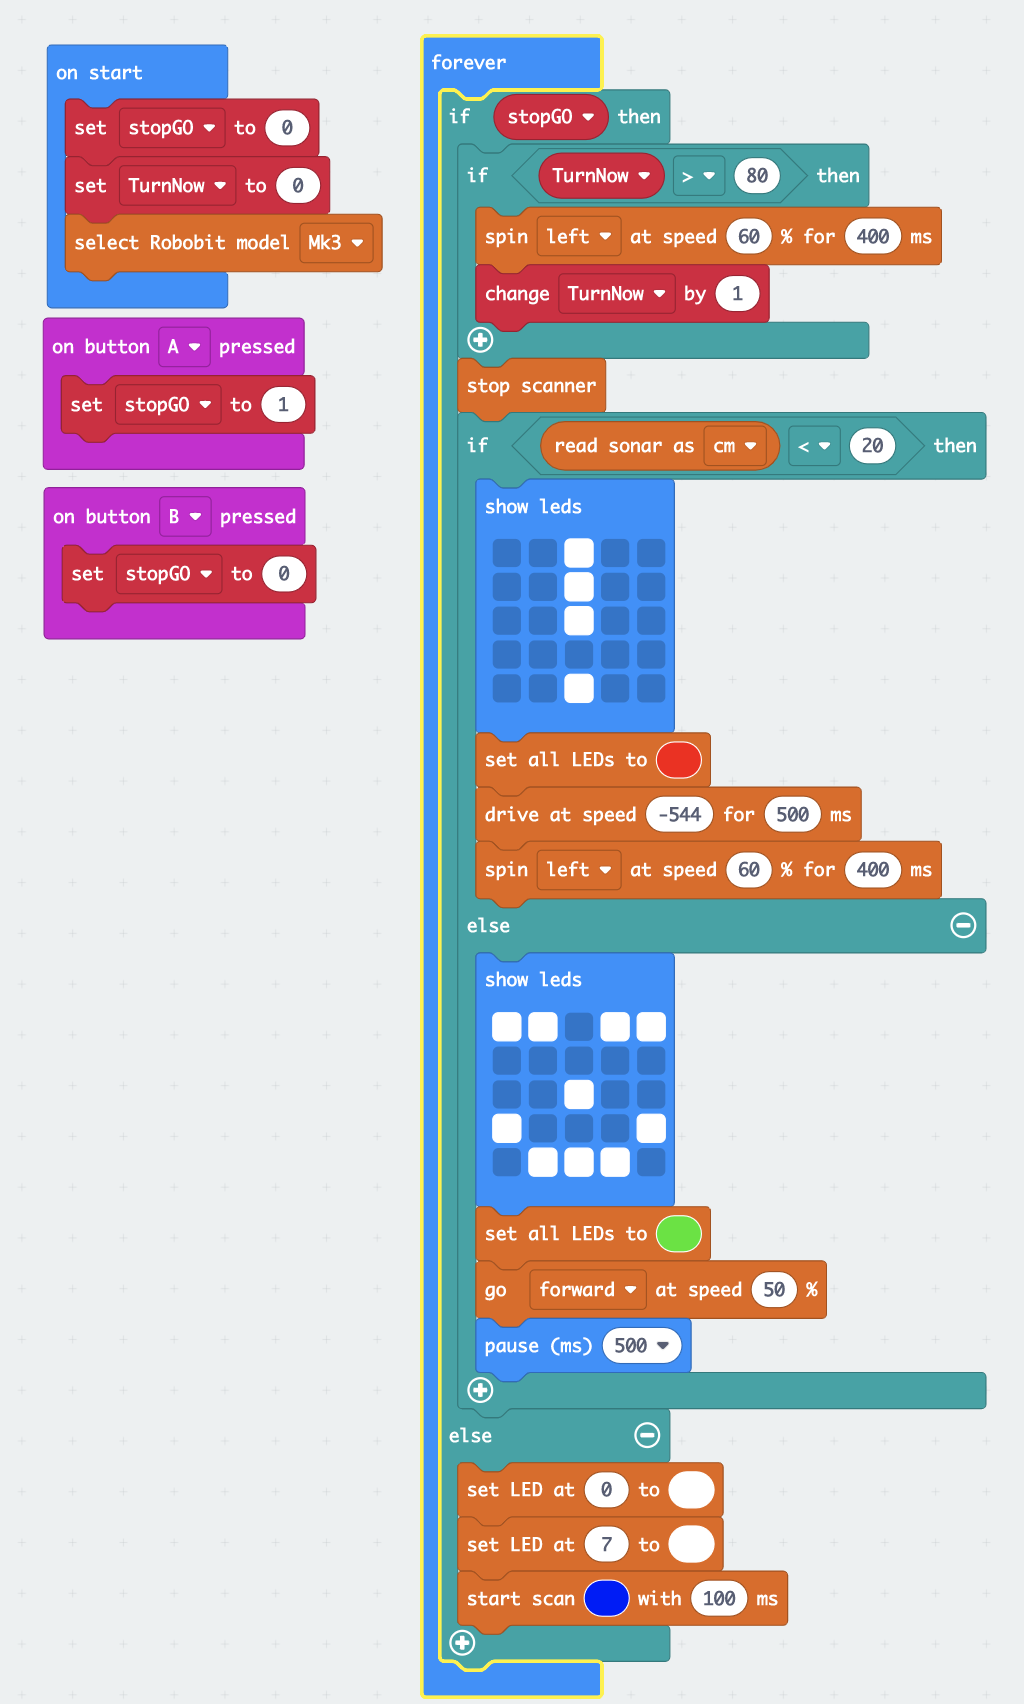
My Code
input.onButtonPressed(Button.A, function () {
    // Turn Motors ON
    stopGO = 1
})
input.onButtonPressed(Button.B, function () {
    // Turn Motors OFF
    stopGO = 0
})
let TurnNow = 0
let stopGO = 0
// On Start, Turn robot OFF
stopGO = 0
// Our model KIT
robobit.select_model(RBModel.Mk3)
basic.forever(function () {
    if (stopGO) {
        if (TurnNow > 80) {
            robobit.rotatems(RBRobotDirection.Left, 60, 400)
            TurnNow += 1
        }
        robobit.stopScanner()
        if (robobit.sonar(RBPingUnit.Centimeters) < 20) {
            basic.showLeds(`
                . . # . .
                . . # . .
                . . # . .
                . . . . .
                . . # . .
                `)
            robobit.setLedColor(0xFF0000)
            robobit.driveMilliseconds(-544, 500)
            robobit.rotatems(RBRobotDirection.Left, 60, 400)
        } else {
            basic.showLeds(`
                # # . # #
                . . . . .
                . . # . .
                # . . . #
                . # # # .
                `)
            robobit.setLedColor(0x18E600)
            robobit.go(RBDirection.Forward, 50)
            basic.pause(500)
        }
    } else {
        robobit.setPixelColor(0, 0xFFFFFF)
        robobit.setPixelColor(7, 0xFFFFFF)
        robobit.startScanner(0x0000FF, 100)
    }
})
17 - STEM Demo Show
Preparation
- Charge all batteries
- 8 AA Batteries for Micro:Bit Robots
- 4 AA Batteries for Kitronik:MOVE Motor
- 2 AA Batteries for piano electronic keyboard
- 2 AA Batteries for Electronics learning kit.
- 2 AAA Batteries for Micro:bit LED kit
- Charge 2 iPads for Spheros
- Charge 2 Spheros
- Charge 2 keyestudio Robots
- Print out Marketing Information on the Robots, their prices, and STEM Tasmania Information.
- Testing
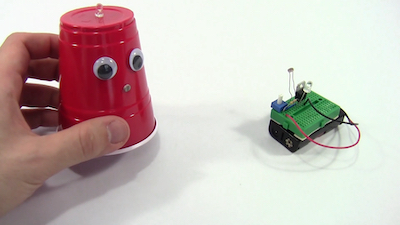
- 2 x Robo:Bit MK3 (Drives and Stops on Objects)
- If anything fails, download code on MK3 Page
- 1 x Kitronik:MOVE motor (Drives and Stops on Objects)
- Micro:bit LED kit - All 4 lights randomly work.
Equipment to bring:
- Water Bottle and snacks
- Pen and note paper for sharing information.
- Marking information
- STEM Magnet building blocks
- 1 x Micro:bit LED example kit
- Snap LED circuit
- Piano electronic keyboard
- Volt+Amp meter electronic circuit.
- 2 x Robo:Bit
- 1 x Kitronik:MOVE
- 2 x keyestudio Robots
- 2 x Spheros and their bases with USB charging leads.
- 2 x iPads for Spheros.
- 1 x Raspberry Pi with Keyboard, Wireless Mouse, and USB-C Power.
- Microsoft Tablet (For kids to Code) with Wireless Mouse, Keyboard, PSU, USB-C to USB Adapter and Cable for Microbit. (Test USB Port on PSU with Micro:bit)
- ACER 15" Laptop with PSU and Mouse (For Minecraft Education)
- HP 17" Laptop with PSU and Wireless Mouse (For Minecraft Education)
- USB+USB-C PSU for charging everything. 2 x iPad leads. 2 x MicroUSB leads.